Pages

Sunday, January 31, 2010

Pine Nut Mayonnaise


These gorgeous pine nuts were hand picked in Nevada. I bought them at the ojai market and hand shelled them (check out the link to this post if you have never seen pine nuts in the shell). The crazy thing is that even if pine nuts are picked in this country, they are shipped to China to be shelled because there is no equipment to shell pine nuts in this country. It's another small example of how the country's jobs have been given away. So the nuts are picked here, where the scent of the pine forest is everywhere, stuffed into the hold of a smelly diesel ship, and who knows if they are hit with fungicide or pesticide there? Or if they are steamed? Then imagine the journey they go on in China, only to be loaded back on a ship....it's complete madness!

It's a meditation to crack the nuts in my molcajete, feeling their soft silky inner nut emerge from the shell. The nuts look and feel completely different. They are still alive. Soaking them brings them into a vivid aliveness!

So, soak 1/2 cup raw pine nuts overnight, then drain.
Add 1/4 cup water
2 tbsp. organic extra virgin olive oil
1 1/2 tbsp. freshly squeezed lemon juice

This recipe is from RAW. I actually made my mayo by first adoring the plump soaked pine nuts then putting them in the vitamix. I tipped in a bit of water, a couple of glugs of olive oil then went out to the east side of my garden to harvest the first lemon from my most recent tree, a gorgeous little lemon tree. (So this mayo is a celebration of the first of the harvest).

Season with salt or any herb or spice that takes your fancy. The mayo thickens as it sits, so you may want to add a little more water next time you use it.

This is so good I never want to eat regular mayo or even Vegenaise again! So worth the time it took to crack the nuts in the first place.

So where is the photo of the mayo? Come on...it looks just like mayo!
It is not. at. all. the. same.


Spinach Hearts with Sesame Sauce


I love it when I find a treasure that someone has thrown away, not seeing its beauty. That's how I feel about spinach hearts. Some people call them crowns or feet, but most people call it the part that gets thrown away. It's the stem clusters at the bottom of the spinach plant.

In Japan, this dish is called Horenso No Neno Goma-Ae.

There is a wonderful book, now out of print, written by Soei Yoneda (High Priestess of the Sanko-in Temple). This recipe and many other beautiful, simple recipes are in this book. If you browse used book stores, watch out for this treasure of a book.

I think of preparing the spinach hearts as a meditation. One needs to make sure all of the grit is removed and that while removing the leaves for another purpose, one preserves the beauty and integrity of the heart. Once prepped, I always let the hearts sit in a bowl covered with a damp cloth over night (or for a few nights....you can keep them in the refrigerator in a container if you want to. I keep mine on the counter. The hearts open joyfully.

It was always curious to me to find that the Japanese serve spinach cold. The leaves are usually blanched quickly, plunged into ice water, squeezed into a block, then the block of spinach is cut into slices.

The hearts, too, in Soei Yoneda's recipe, were blanched for a couple of minutes, then took the ice water plunge. They certainly retain more of their crisp beauty that way, and for a summer dish, I'd do that too. Right now, I'm more interested in a hot dish because almost everything else I eat is cold, so I'll sacrifice looks for warm food. Wilty, but warm and still delicious.


Sesame Sauce:
4 tbsp raw tahini
2 tbsp tamari
2 tbsp mirin (Japanese rice vinegar)
2 tbsp sake (or not...it's up to you)

I make a much larger batch than this because it's also delicious with cooked grains and as a basis for salad dressing. Whisk until smooth. Add a little water if it's too thick. (Some tahini is thicker than others).

You'll need more spinach hearts than you think because they cook down, even when you only blanch them briefly. I usually plan a "spinach week" where I'm using spinach two or three times for other things. (Not hard when you are drinking a lot of green smoothies ). I collect all of the hearts for this dish, and it's a treat.


Designing a RAW kitchen

I'm seeing the kitchen differently since we've been eating mostly raw, living food. Today I noticed that I've begun to put vegetables in water, like flowers, until they are used. We eat so many vegetables it's not long before they are used, but treating the vegetables like precious roses makes a significant difference to both how they look and their flavour. Being refrigerated seems to make them go to sleep. Cutting their stems so they can accept the water they are standing in brings the life back to them.


Washing salad greens, spinning them in the salad spinner, then letting them sit there with the water from spinning beneath the basket of the spinner with the lid on for a little while, gives the lettuce a fresh picked perkiness.

I've recently found a recipe for "spinach crowns" (although I call them spinach hearts) which uses the bottom part of the spinach normally thrown away. They don't look like much when first separated from the leaves, but once cleaned , I wash them and put them in a bowl with a tiny bit of water at the bottom. A damp cloth goes over top. They spring to life in a few hours and look beautiful on the plate. Not convinced? I'll post the recipe soon.

This is the damp environment to wake up the spinach hearts. They open beautifully under cover.


See?


There is a different pace to a raw kitchen. Because so much attention is paid to waking the living spirit of food, a lot of grains and nuts and seeds are soaked. Some are then also sprouted before using. Grains might be soaked, sprouted, ground, dehydrated and finally used as flour. Why soak?

Seeds, nuts and grains want to protect themselves from sprouting at inappropriate times or rotting so they have enzyme inhibitors called phytates in them. Soaking removes the phytates and wakes up the plant in the grain, nut or seed. This also makes its nutrients more bio-available to us. One needs to think in the Long Now to begin the process of soaking or sprouting ahead of time.

One also needs a soaking and sprouting station in the kitchen. When I first began I had bowls of soaking grains, seeds and nuts in random places on the kitchen counter. It was chaos. A simple tiered shelf meant to go in a cupboard gave me the soaking station I needed. Of course, one could also use a cupboard but I know if I did that I'd forget about whatever was in the containers. These containers have lids but they are not airtight. Air is essential for waking up. I also use this station for culturing nut cheeses once they have soaked.


I was lucky to find a large Ball jar with a sprouting lid (allows water in and out but does not allow contents to escape).


While I am sprouting grains or seeds in it, I keep it in a draining rack, but covered from daylight with a cloth. (You are probably wondering what those doily things are. I'll get to that in a minute.)


After an initial over night soaking, the spouts need to be rinsed two or three times a day, depending on the temperature. Maybe it's just that I am amused by small things, but I enjoy that I can fill the jar with water without taking the lid off and that it's so easy to lean the jar in the drying rack and watch the water come out the spout. A drying rack with a spout? Like I said...small things.....


Oh, and the things that look like doilies? Well, practically, they tell me that something in side is processing, becoming more alive, and may need my attention. On a higher level, it connects with the work of Masaru Emoto. Maybe I'll explain that more in another post.

So, as fire and ice are central to a regular kitchen (stove and refrigerator), water and wind (high speed blender and dehydrator) are essential to a raw kitchen. Time is entirely different in a raw kitchen. Dishes are made on nature's time. "Cooking" is done by sprouting or slowly drying. It almost feels like I use a different part of my brain to prepare food this way.

I'd like to design a raw kitchen from scratch. Even to SEE one! I'd like that for a start.


Thursday, January 28, 2010

Walnut Persimmon Bars


Perssimons were known to the Greeks as "the fruit of the Gods". It is mentioned in "The Odyssey" as being so delicious that those who ate it forgot about returning home and wanted to stay with the "Lotus Eaters". In Japan, it's name is kaki.
I lived in Japan for two years and ate Japanese food almost exclusively, yet never had the courage to try the beautiful kaki, which was allowed to ripen to a jelly-like state before eating. Maybe this was why I eventually came back home.
This fruit, from the Ojai farmer's market, the last fruit on the trees for this season, is a fuyu persimmon. It is less astringent and the flesh can be eaten when still firm. I think they are beautiful.

I grew up in the North, where the growing season is so short that September found almost every house with green tomatoes lining the window sills, brought inside to save them from the frost. It pleased me to line up these persimmons near the window to let them ripen a little more, but not to the squishy soft stage.

Making the bars couldn't be easier. Cut open the persimmons and remove any seeds. Remove the gorgeous leaf part at the top, and any blemishes on the fruit. Wash and put the persimmon pieces in the Vitamix. I didn't add any sugar because it seemed sweet enough to me. If you regularly eat sugar, sweeten to taste. Chop up walnuts and mix the puree and walnuts together.

These bars are not baked. They are dehydrated. I use an Excalibur dehydrator. Arrange the mixture on a teflex sheet. I made the outside edges higher because I thought the mixture would slump, but it didn't. Dehydrate at 105 degrees F until firm. If you want some extra sweetness, dust organic powdered cane sugar on the bars after you've cut them.....but taste them first. They may just be perfect as they are!

Tuesday, January 26, 2010

Cultured Cashew Cheese Variations

When I first made cultured cashew cheese, I fell back on my cultured goat cheese ways and put the cashew cheese in a press. Since then, I've been making variations that are different in both flavour and shape.


This is a lemon zest and cracked peppercorn cheese. The lemon zest and peppercorns were folded into the cheese and then it was formed into a ball, just by using thin spatulas. Because I was celebrating the return of the sun after a week of rain, I gave it a sun ray crown and brought out the citrus locally called "The Hand Of Buddha".


It was delicious with olive tapenade, hummus, salsa and tomatoes. I still have some of the basil oil that I made the other day. It is holding its colour nicely, and still fun to drizzle on the plate.


The second variation is a red pepper and chipotle pepper with smoked paprika and herbs.


This shape is traditionally a goat cheese shape, but since I have the form I'm using it. I partially dehydrated the red pepper that I put on the top of the cheese (in the bottom of the mould).


The next time I make this I'm going to partially dehydrate the red pepper that I add to the cheese as well, because the moisture in the red pepper makes the cheese softer than I would have liked. It still tastes and spreads well, but it was too soft to pick up the veins of the banana leaf in the mould. That would have been a nice touch.....next time.....


The piccante cheese was good pared with salad and the, by now, ubiquitous flax chips. Just before lunch, the sun slid under a cloud and as we were finishing, the rain began. Blessed rain! We need it.

So, there you have it: two kinds of pepper cheese, variations on a theme.


Monday, January 25, 2010

Strawberry Raw Granola Bars


I've been making sprouted buckwheat granola, and since I'm half way through making another batch, decided use what I already have to make granola bars. This is the granola....


There were extra dehydrated strawberry slices, so I chopped them fine and also cut up several white turkish figs, both to bind the granola together and for added fruit flavour. The cacao butter was still on my mind from making the bars yesterday , so I heated some up and this time added the granola mixture to the melted cacao butter, then put the mixture in a pan.


This went into the freezer until the bars were cold enough to cut into squares.

Pretty can also pack a lot of nutrition.


Sunday, January 24, 2010

My Own Yoga Bar

Yesterday I was reading Natural News and Mike Adams was reviewing a new raw food bar. He was excited that there were only five ingredients in the bar, all raw and all organic: Dates, pistachios, cacao butter and honey. I happened to have all of those ingredients in the house so I decided to make my own yoga bar based upon what I thought it might taste like. James and I shelled raw pistachios by the fireplace, then I soaked the cashews and the pistachios over night.


In the morning I dehydrated them a little then chopped the nuts and the dates together. (Easy with a mezzaluna). Heat the cacao butter gently (also added a little coconut butter on a whim). I had decided that the mixture was sweet enough with all of the dates so skipped the honey. When the cacao butter was melted, I quickly poured it into the mixture in a thin stream while mixing. Everything was transfered to a cookie sheet and put into the freezer for a few minutes.


Once the mixture was partially hard, I cut (nudged, really) it into bars and put the tray back into the freezer. Mostly because I wanted to go to the beach.


I didn't chop everything super fine because I wanted the crunch. I enjoyed giving each portion its own wrapper.


My very own Yoga Bar. Now, for fun, I need to find one of those bars Mike was talking about and do my own comparison.

Seriously, fruit and nut bars are so easy to make and delicious to eat..why buy them?


Friday, January 22, 2010

Cacao Goji Bites


Sometimes just a bite of a treat is enough.
That's when I bring out the balls. I suppose I should call them truffles, but around here, they're just happy balls.

Here's what they are made of. There are no exact measurements. I put in varying amounts of each ingredient, depending on how much chocolate or other ingredient I'd like at that moment. The yacon is really all of the sweetening that's necessary, but some coconut palm sugar granules could be added for more sweetness. Taste as you go.
At the top (twelve o'clock) are cacao beans. They can be broken down in the vitamix to cacao nibs (at 6 o'clock), and then into powder. Leave some nibs if you like their chewiness. At 1 and 2 o'clock are yacon slices. At 3 o'clock is cacao butter. I also use some coconut butter (not shown), but this makes them softer, not so good for summer. At 4 and 5 o'clock (it's so anachronistic to be writing o'clock and using a clock face model) are poppy seeds and hemp seeds which can go into the truffle but I roll the balls in these. At 7, the goji berries. At 9, pumpkin seeds. At 10 or 11, angel hair coconut.

Soak the pumpkin seeds, goji berries, yacon slices and coconut. Strain and put into the dehydrator just long enough so that the excess water is off them. Put them all in the dry carafe of the vitamixer and blend them all to a nice consistency (or chop by hand with a mezzaluna), some of the coconut can be reserved to add in later for texture. Melt the cacao butter and coconut butter slowly, keeping the temperature low. When melted, stir in the mixture. roll into balls and then roll in hemp seeds or poppy seeds. Refrigerate.
I began to make these when I decided that I could have chocolate whenever I wanted, as long as I began with the whole cacao bean. Spending the time making these, and other chocolate treats certainly cuts down on my chocolate consumption.


Thursday, January 21, 2010

Flax Chip Variation (from Dragon Snaps)


I've been trying variations of the Dragon Snaps recipe because we like these crispy critters. This last batch I added more onion and garlic, less tamari and maple syrup. I left out the garam masala and paprika. In some, oregano was added. I wanted, with these chips, to have both crispy and chewy parts, so small pieces of red pepper (previously partly dehydrated) and very thinly sliced pieces of onion were sprinkled on top of the large sheet of flax puree just before it went into the dehydrator.
These chips are wonderful with hummus, guacamole, salsa or anything else you would eat with regular chips....just a whole lot healthier!


This is how the mixture looks before it goes into the dehydrator. Any herbs can be sprinkled on top, as well as tiny zucchini bits or, as in the photo, onion and red pepper.


Crispy Kale Chips, Italian Style


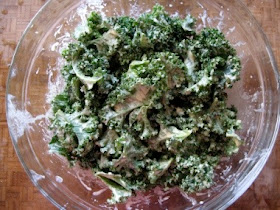
Awhile back I posted a recipe for cheesy kale green chips which is a bit of a misnomer because the cheesy taste comes from nutritional yeast. Anyway, with this batch I tried two different things. I used the "Italian" recipe which can be found at the bottom of the cheesy kale post. Purple curly kale was used. I remade the recipe somewhat and, for ease of massaging the sauce into the kale and to save room in the dehydrator, I ripped the kale into bite sized pieces instead of dipping whole leaves.
The new small size was a hit for casual eating, but I over-did the dehydrated tomato slices so the tomato flavour dominated too much. Next time I'll add more jalapeno pepper, less tomato, more nutritional yeast and some oregano.

P.S Below is the original recipe, with green curly kale, torn into bite sized bits. All time favourite, so far.


Massaging the sauce into the kale.


Massaged kale on the dehydrator rack.


Fuyu Persimmons


I have always been uncertain of when to eat persimmons. The fuyus are ready to eat when a little soft....no need to wait until they are jelly-like. My only complaint is that I waited so long to try them, as the season is nearly over and they are delicious. I'm hoping there will be more at the farmer's market this weekend, because I want to make a persimmon puree with walnuts, which will be dehydrated and cut into squares. For now, pictured are two whole persimmons, dehydrated peeled fuyus on the left, unpeeled fuyus on the right and a persimmon fruit leather in the centre. Dehydrate at 105 Degrees F. so that the enzymes are not destroyed.

Monday, January 18, 2010

Herbal Vinegar (Boost Mineral Intake)


Herbs like nettle, chicory, burdock, dandelion, kale, mustard greens, and lamb's quarters are nutritive and tonic. Adding a splash of vinegar to your food helps build bones because it frees up minerals from the vegetables and greens you are eating.

Find a glass jar that you like. If it has a metal lid, the best thing you can do is cover it with melted beeswax, as metal reacts to the metal and will, in time, actually eat though the metal lid. Even several layers of waxed paper, fixed in place with elastic bands will suffice to cover while the herbs macerate.

Stuff the jar full of the herb (I've used lamb's quarters today). Best to chop it up, although I forgot to do that this time. I just used the fresh tips. in this early spring here, most of the plant is fresh. Pour room temperature apple cider vinegar (I use living cider, with the mother). Label with name of herb and date. Put it in a dark cupboard for six to eight weeks, then strain and bottle your vinegar. Some use the "pickled" herbs, others discard them.
Pour a little over cooked greens, stir fry and use as an ingredient in salad dressing. A teaspoon or so in a glass of water, hot or cold, is delicious, always refreshing and makes your body more alkaline.

Other vinegars can be made with aromatic herbs, single or in combination.


Sunday, January 17, 2010

Raw green weed and fermented coconut pudding


Here is another green pudding. This time the star ingredient is lamb's quarters. This pudding is fast and easy to make in the vitamix. Lamb's quarters, with one peach, one mango and either a handful of strawberries or lemon juice to balance the sweetness. With a dollup of cultured coconut on top.

Lamb's quarters (pig weed, goose foot, wild spinach) Chenopodium album is usually thought of as a weed. It is one of the most nutritious wild foods you can eat, and it's probably growing in your garden.

Pine Nuts In The Shell


When I bought the pine nuts at (Ojai Farmer's market), I had no notion that I was also taking home with me the essence, the sweet scent, of a pine forest.

Crushing the shells and removing the nuts was a meditation for me. The scent of the pines was released, subtly, as the shells were cracked. The nuts inside were surprisingly soft and delicious, with a flavour different than dehydrated pine nuts usually available. When opening the nut, tiny shoots were sometimes present.........living food. The first thing I made with these fresh pine nuts was a pine nut/date pudding.

Young Coconut Kefir


Coconut kefir is delicious, sparkly and full of healthy, healing probiotics. I know of only one company that makes and sells coconut kefir, and it's price is comparable to a fine wine. Best to make your own. You need fresh young coconut juice. See opening a young coconut if you have never done this. The best place to find fresh young coconuts is in an Asian grocery. Once you get the hang of making kefir, you might like to buy a case (usually 9) and get a discount (if your grocery gives case discounts). Look on the bottom of the coconut. If it has any dark spots, don't buy it.
Most people make coconut kefir from a commercial starter, the same as with cultured young coconut pudding It's more adventurous, and more life sustaining (I think) to use kefir grains, both the milk and water grains. Dominic Anfiteatro's wonderful kefir site has all the information you will need to step into the world of live cultures.
Serve alone as a refreshing drink or with a simple desert like this raspberry tower. The wonderful thing about this sparkly, champagne-like drink is that it's healthy for the whole family. Great for celebrations.

Three Pudding Raw Parfait (Healthy Fun Food)


      If you have just finished whipping up the coconut pudding from the last post, here is something to do while it ferments, so you will be ready to make 3 Pudding Raw Parfait.
The white layer is the cultured coconut pudding .

The brown layer is a date/pine nut pudding. Simple to make: either use very fresh dates, or soak dry ones. Combine equal parts dates, pine nuts, water in the high speed blender. Voila! Creamy and delicious. I used fresh pine nuts. You can also soak dried pine nuts. Grate nutmeg on top or add into pudding.

The Green Pudding uses green smoothie ingredients, so consider making yourself a green smoothie for lunch on the day the coconut pudding is ready, using the rest to make this pudding in the evening.
Green Smoothie:
In a high speed blender combine:
lettuce, avocado, pears, pea sprouts (can be any kind of sprouts or microgreens), one cup water (more or less).
Make it on the thick side with the pudding in mind, like a thick milkshake.
After you have a delicious glass full, refrigerate the leftover smoothie (which makes it a little thicker). Stir in long strand raw coconut and a tiny bit of coconut palm sugar. Finito! Green pudding.

For more information on green smoothies and many combinations ( I add new combinations as we make them), read Green Smoothies  also see weed pudding (lamb's quarters) for another green pudding that would work just as well as the green smoothie above.Adding the coconut makes the desired texture and mouth feel.

Now find some nice glasses, cut fresh strawberries, banana and walnuts. Enjoy layering alone, or get everyone to help. It's a festive meal by itself.

Cultured Young Coconut Pudding


Cultured coconut pudding is delicious on its own or with any kind of fruit.


Once you have opened the young coconut, make sure that the "meat" is white, not pink or purple, which indicates that it has spoiled. Spoon out the white meat. Add it to the high power blender. If you want vanilla, snip off the hard ends of the vanilla bean cut in half and add. Blend to a smooth paste. If you have coconut kefir already made, add some before blending. This will be the culturing agent. If you are beginning, you can order a culture starter. (Just google coconut kefir starter...there are many options now, Body Ecology being the first). This starter can be reused for a few generations if you keep it going, as you would with yogurt, by adding some of the previous batch to the new batch.


You can also make coconut pudding and kefir from kefir "grains". If you use milk grains (putting some grains in with the coconut before you blend it) use extra grains, because you won't be getting those back. You can also start your kefir or pudding by adding water kefir grains or the kefir made from them. I like to do this, as it's cheaper and sustainable.
To learn more about fermenting coconut or water grains or milk grains, check out Dominic Anfiteatro's wonderful and comprehensive site. This page is specifically about water kefir, but there are hundreds of other pages with fermenting information as well.
click here for more information. You can buy "grains" from Dom and also join his Yahoo group where thousands of people from all over the world compare, ask questions and trade grains. Dominic also has a book on kefiring. He's truly a treasure.

Well, you made it back from Dom's site! Here is what the coconut pudding looks like once it has cultured...full of air bubbles.


This is an image of what NOT to do. The first time I made coconut pudding, I had this romantic notion that I could make them in these sweet little jars, just like yogurt cups. In the middle of the night I heard strange sounds. Plurp, blrap, pluuurp, and then a loud band as one great air bubble erupted and sent pudding all over the ceiling. This stuff is alive! It needs air to breathe and space to grow. Use large jars, leave lots of head room and don't attach the lid tightly.

Fermenting kefirs and puddings like a temperature of around 70 degrees Farenheit to grow and develop. If your house is cooler than that, you can wrap the jar in a wool blanket and put it in an insulated picnic cooler. If it's warmer, put the jar in the cooler with some ice packs. Don't worry too much....it's not rocket science. If it cultures too quickly, in the heat, the flavour will not be as delicious. If it's way too cold it will be difficult for the culture to begin its work.
Once the coconut has cultured keep it in the refrigerator....assuming you will have enough left. This is delicious food.


**I just found an email that I sent writing about what happened with the exploding kefir. I had forgotten some of the funny details:
"I have to tell you what happened last night with the young coconut meat.
I thought I would try an experiment, inspired by you saying that you couldn't see the grains but still something was making kefir.

Water grains look different than milk grains.
They are smaller and sometimes called crystals because they are translucent.
Lately I've been making fruit kefirs with only the residue in the bottom of the last batch, no visible grains in the residue (as an experiment).
Last night, after putting the coconut meat in the blender with some coconut juice and vanilla bean seeds, I put some of the thick residue with kefir into the creamy coconut as a starter.
This was a big deal, because I had been using the body ecology starter that comes in packets for the coconut kefir pudding. (expensive)

I filled the jars a little over half full, leaving what I thought was a generous amount of space for expansion) and as an afterthought, set them on plates.
At a little after one in the morning I was wakened by a "pfffttttttt", "ppppfffftttttt", "pfttttt" sound, getting louder and louder.
I thought maybe raccoons had gotten in the cat door or something.

I went downstairs and found the coconut pudding oozing out of the jars and taking over the kitchen. I was using snap top jars and so decided to ease off some of the pressure. Half awake, I chose the biggest jar first. In an instant, soft, fluffy coconut pudding was all over me AND the kitchen.
OK.....I was now AWAKE!!
It took about an hour to clean up most of it, but the experiment was a success. Water kefir grains and even the residue works!

Meanwhile, the kefir grains which had been in the refrigerator for a week and a half were still dozing in the coconut juice and nothing much was happening. (This morning they are awake and the juice is beginning to fizz.) They must really hate being refrigerated.

I feel like my kitchen is getting more energized and in tune with the kefir, as each time I make something I put less starter in and get a bigger result.
Either that or it was the Beltane eve (half way between vernal equinox and summer solstice) moon acting on it.

For whatever reason, it was deliciously alive,"

Silani


I'll write about water kefir one of these days, but I'm sure you'll find it on Dom's site.